This is how buckthorn dye dyes more than 3 months after it was made. It was not kept in a fridge, no special treatment of any kind. There really is something to those hard core traditional dyes.

This is how buckthorn dye dyes more than 3 months after it was made. It was not kept in a fridge, no special treatment of any kind. There really is something to those hard core traditional dyes.
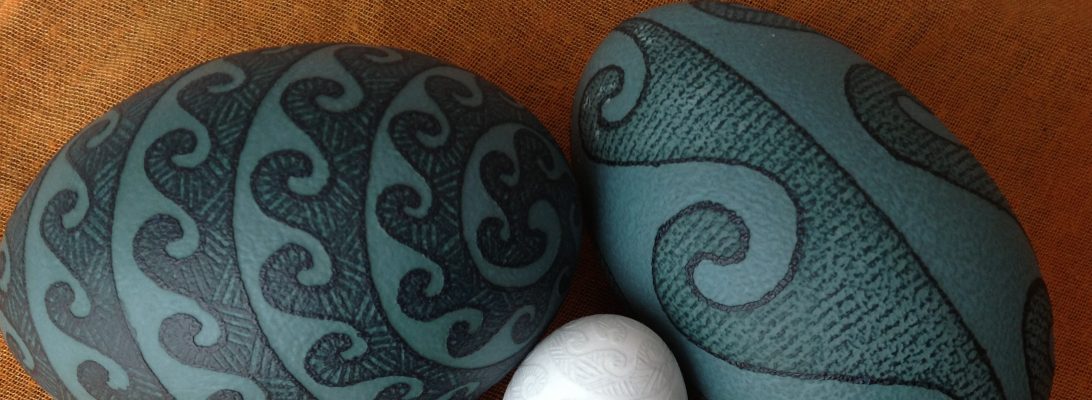
Buckthorn berries (and less so the bark) have been traditionally used for dyeing in the Middle East and the Mediterranean, later also by professional dyers in North America. I didn’t have access to the berries, but I bought the bark in the herb store and tried it. This buckthorn variety is Rhamnus frangula, other varieties exist and have been used for dyeing even more than this one. The egg on the left is the dye with alum, the one on the right is the same dye post-mordanted with iron.

The books (Wild Color by J.Dean) say that you can extract the dye from this bark without even cooking it, by just pouring boiling water over it and soaking overnight. It is suggested to then simmer the bark again to obtain the second batch of the dye. I tried both, with more or less the same result, so you could make half a batch by soaking and the other half by simmering and then mix them together. Like most wood or bark chips, you can dry them out afterwards and try using again for lighter shades. I have also added some cream of tartar to one of the dyes, as this was suggested by Maiwa, but didn’t see much of the difference. Still it’s something worth experimenting with in the future.
The dye itself doesn’t have a very nice smell, however, unlike most natural dyes it did not spoil after sitting for months on a warm counter. I have made it in mid-December, and it still works in March. From that point, it is definitely a keeper, worth exploring more. The color is also very nice, and seems to give a lot of potential for over-laying with other colors. The iron post-wash was not particularly effective and has partially come off when the wax was removed, it might have worked better if I added the iron directly into the dye instead of soaking the egg in iron-water. I might try that next time, I actually do have two batches of this (and it doesn’t spoil!), so I can turn one of them into an iron batch.
I wanted to keep using the dyes I made for the Pysanky Toronto retreat. The dyes were not very cooperative at the event, but when they came back home and relaxed a bit, they were dyeing just fine, so it would be a shame to not use them. Still working on the strokes, and starting to work on the variety of patterns. All these patterns are from the Lithuanian book.
Dyes:

The 3-day pysanky retreat in Toronto is now over, it’s been a wonderful experience, amazing people, new friendships, exquisite art, ingenious craft, and the atmosphere full of inspiration, which, I’m sure, will last for a while. If you have an interest in decorating eggs, whether traditional, or contemporary, you have to come next year! (Possibly in June). Whether you are new at this, or you have been doing it for years, you will learn a lot.
Now, this is the only egg I managed to do, I just enjoyed too much seeing what others are doing, chatting, learning…

I was asked to do a presentation on natural dyes, and that in itself was a wonderful experience for me. I felt welcomed and very much encouraged, there is a lot of interest and desire to use natural dyes on eggs. I also made brought a set of 6 dyes, and even though natural dyes require much more time than chemical ones, they are very unpredictable, and some of them did not want to cooperate, several people tried them. By next time I think I will figure out a more cooperating set of dyes, and that will probably make a difference.
Gold – coreopsis extract, brown – combination of dried sappan wood dye and logwood extract dye. Chicken egg.
Here are some eggs that I made last year but didn’t get to post on the blog. As usual, natural dye experiments.
Smaller egg – duck, yellow-marigold, brown – dried elderberry (not particularly reliable, seems like). Bigger egg – goose, yellow– marigold, orange – madder, brown – dried elderberry.
Yellow – weld, olive green – malva, blue – cabbage, pink – old madder+cochineal after vinegar. Smallest egg is chicken, then duck, the goose.
Weld (yellow), cabbage (blue, green, teal), duck eggs.
Weld (yellow), cabbage (green/olive), and madder/cochineal (orange), duck eggs
Here is a different technique of drawing with wax on eggs. My grandma, who taught me to draw on eggs used to do these with a simple matchstick, while heating wax in a tin on the stove. I haven’t done this for probably 25 years (first attempts look a bit shaky), finally decided to try again. Not with a matchstick, but with a thing they call here drop pull tool, but who knows, now that I figured out the other components of the process, I might even try the matchstick again.

This technique comes from a very special region of Western Ukraine, Lemkiwshchyna, mainly in present-day Poland (and perhaps also partially Slovakia). It is a very tragic place, and very special place, that has been robbed of its people during and after the second word war, it had its own dialect that was very different than others, its own amazing sings, and its own manner of drawing on eggs, of course, among other things. My grandma grew up there, her father was a priest and was sent there to serve, and lived there still for a few years after marriage. My grandfather’s plan, who was also a priest, was to immigrate to US, and the tickets for the ship were already bought, but apparently my aunt got sick, and grandma refused to take a sick baby sailing across the ocean. That chance was lost and they ended up moving to the Soviet Union in the middle of the war. Even though originally we are not “from” there, my grandma’s best years were spent there and she loved the place very much and gladly shared the memories, stories, and these kinds of eggs as well.

Here, above, is the tool I used for these. This is a thick one, I have also some thinner ones somewhere in the box, I will probably explore those next time. You dip the head of this “pin” into liquid hot wax, and draw these elongated drops on the egg surface.
And here, below, the oil-heating thingy I used for heating the wax. It’s quite convenient. Someone gave it to me as a gift a while ago, and I was saving it actually for this purpose. I wasn’t sure whether a tea light candle would keep the wax hot enough, but it does.

Now, the dyes.
The beige one is black walnut on its own. I’ve used this dye few years before, and it’s a bit strange – thick and dark brown, almost like molasses, but it doesn’t absorb well into the egg shell. Almost like henna, which gave very disappointing results. This one is more interesting though, because it seems to have the capacity to lighten the darker egg, which could be useful if one wants to use incompatible colors on the same egg. I’ll show this to you later on another egg.

The pink, or maybe scarlet is a few weeks old sappan wood dye. I wasn’t so pink in the beginning, maybe the dye is wearing out, and maybe it became a bit more sour since a few eggs have been in vinegar baths. When used on fabric, this dye apparently can change from orange and warm red all the way to crimson and even purplish. when the Ph is changed. So maybe this is what happened…

The reddish-brown is walnut over sappan wood.

The purplish-maroon is sappan wood over logwood. I played with logwood last lear a bit, there is already a post somewhere earlier about it, what I have noticed today is that while on its own logwood does not like to adhere to the shell, looks powdery and easily comes off with wax, overdoing with another dye, in this case sappan wood, helps the color stick to the egg, and saves it from wiping off with wax. I’ll play more with this and will probably show more eggs.

Now, both (or rather all three) of my yellow dyes have died, the seem to spoil very fast, I was quite disappointed that I didn’t get a chance to use buckthorn more, but I just received an order of my favourite coreopsis extract. It’s a different make, so I’m not quite sure whether it will work, but I guess we will see :).
Roger.
Here is my first experiment using natural dyes on ostrich and emu eggs. I made one of each, first etched them in vinegar, then used the same two dyes – my favorite coreopsis for yellow (turned out sort of green on emu egg) and madder+cochineal for red (brownish on emu).
Here’s the ostrich:
 Photo courtesy of Mykola Swarnyk
The dots are specific to ostrich egg shells. The shell itself is very smooth, similar to rhea, and the wax tends to peel of sometimes – not sure yet what to do with that, perhaps making sure that the egg itself is on the warm side and the wax is well heated would help.
Here is emu: Photo courtesy of Mykola Swarnyk
It was etched again after the red dye.
In general, I would say, the experiment was interesting. It takes a lot of dye though, and unless one is doing a good number of big eggs at the same time, the amount of the dyes seems rather wasteful, it’s not clear what to do with them afterward – I put mine in a fridge and used some for the eggs in the previous post, but they did not work quite as well as the fresh ones would be expected to work.
For now I only have one or two emus left, and no other big eggs (have plenty of duck and goose instead), so probably will not be dyeing the big ones any time soon. It would be interesting to use dye on rhea egg – the color of its own shell should give nice tones.
Logwood is and old dye (apparently it’s been used for dyeing since 16th century). It is supposed to give a range of colors from blue and purple to black. I got sort of dark brown with the addition of alum and chalk.

I found the dye to be not particularly eager, maybe it doesn’t like eggs so much. It also comes off easily when the wax is being taken off with candle. That, however, I have noticed with a number of natural dyes, that you have to be much more careful and gentle when taking off the wax, than with chemical dyes. So I often add much more wax before taking it off to seal the whole surface of the egg. Another thing I noticed is that the natural dyes seem to burn much easier than the chemical ones, that is, also when the wax is taken off with the candle.
UPD: To help set the logwood dye in other eggs, I have over-dyed them with another dye (in that case red sappan wood). While the egg remained almost black, the powdery surface of logwood was nicely sealed, and the issue of the dye coming off with wax has been resolved.
To see other eggs dyed with logwood, use logwood tag.
Here is the result:

You already saw the previous post with yellow coreopsis dye. I must say this was my favourite dye, and I was extremely lucky to have started with it, because I have struggled quite a bit with the next dyes. Coreopsis give a good intense yellow with relatively little dye, without cooking (just boiling water), it dyes quite fast and works well for a long time. While the red dyes have spoiled by now, this one seems fine still, and smells as beautifully now, as it did in the beginning, in spite of having been sitting in a jar in a hot room. I love this dye and will definitely keep using it.
Now, one by one.
1. coreopsis – yellow, madder standard and cochineal – red (50-50 mixture, twice).

I would have probably dyed it for the third time, the plan was to leave it in the dye over night one more time (it had already a session of few hours and then once overnight), because it still had some patches not fully dyed to my liking, but when I came from the week-end of being away, the dye has spoiled, so I’ll have to try a new batch of red dye eventually. I have really struggled with both madder and cochineal, I was not getting the intensity of color that I was expecting based on other people’s reports (and probably based on my amazing experience with coreopsis), I have used up the small container of madder standard in the process. I still have a container of madder rich, but that has turned from powder into a piece of rock, so I’ve let it be for now. I am tempted to just buy some regular madder in a herb store – it comes both in the root form and in powder, and see whether it works better that this fancy dye powder. We’ll see.
2. red cabbage – teal, vinegar – white.

Red cabbage was a nice experiment, because that is something that is easily available in a grocery store. I did add a mordant, and changed the pH balance to have a blue tone instead of purple. It smells like cabbage, is rather weak when dyeing, and takes a while, but still it works, and let’s see how the color withstands time and light. Maybe I’ll show later in a separate post and in detail, how I made that dye, especially if I manage to get another egg or two dyed in it.
3. coreopsis – yellow, black walnut – brown. Goose egg.

Black walnut worked sort of OK, but took a while to dye. It’s good as foundation (or over-dye) for other colours to make them darker. Perhaps I should have dyed this one two or three times. The dye powder is coarser than others, and I have more of it, so I will likely play with it a bit more, to see whether I can get the color more intense or have it dye faster. The egg pattern is not traditional, it is from a memorized and partially improvised version of a trypillya-style egg I have seen before. Not sure who is the author of this pattern, if I knew I would say.
4. black walnut – brown, vinegar – white.
I did an experiment here, because this was an etched egg and I did not want to mess up the while background by taking the wax off with the candle, I did half of it with hot water and half with hot oil. Turned out, walnut did not like one of those procedures (neither, by the way, did the etched cabbage egg above), guess which was the procedure not liked by walnut and cabbage? You can see that the dye on the right (or bottom) half of the egg has partially washed away. Didn’t like the water, liked oil just fine. You’ll see later that lac did not like oil. But maybe would not have liked water even more, who knows…

5. coreopsis – yellow, red cabbage – pale green, lac and then black walnut – brown.
This is the egg from the previous post.

So the red cabbage gave this pale green instead of teal-blue after coreopsis. I fell in love with this pattern earlier this year, so here is a comparison, the same pattern dyed with chemical dyes, with natural dyes and without dyes – etching with vinegar on the brown egg.

6. coreopsis – yellow, madder and cochineal – red, lac – burgundy, vinegar – white.

In the photo below you can see that lac was not happy at all and came off with the wax. Not sure whether it did not like the hot oil, which I used to take it off, or maybe it was just generally unhappy. It did not behave like this in the egg above when I used black walnut over lac, maybe this is what I should have done here. But, in general, lac stinks (worse than cabbage), it takes a long time to dye, the color is not particularly nice, and as we can see, does not stay so well. And it spoiled also within the same timeframe as madder+cochineal. I still have some left, so I might do more research to see whether I can add something to the dye to make it more happy (chalk? cream of tartar? something else?) and play more with it, but probably not any time soon. I will probably try out other versions of similar colours that I have not tried yet before coming back to this one.

See, this is lac by itself, the first try on plain egg – I should have known still from this first run, that is does not stick all that well to egg, the dye came off just by me wiping the egg dry.

So, that’s it for now. Ask questions if you have any.
All the dyes I have used here besides red cabbage are Maiwa extracts in powder form.