Left to right: elderflower, coreopsis extract, buckthorn

Left to right: elderflower, coreopsis extract, buckthorn
Berries are special, tricky but special. I didn’t even know this berry existed before I moved to Regina, but it was very much used by the natives here (it was supposedly one of the ingredients of pemmican). It looks a bit like a large blueberry, though it is supposedly more closely related to apple, it tastes a bit more like black currant maybe, and once you cook it, it smells beautifully of cooked sour cherries. And it dyes. This was made from cooked frozen Saskatoon berries with alum.
Shades of blue are just the Saskatoon berry dye, and other shades are over-dyed with other colors. The dye is rather strong and tends to overpower the colors under it, but if you put it into red or yellow after the blue, shades and even different colours can be achieved. The purple egg is sappan wood over sask berries, the green ones are coreopsis and elderflower over sask. The yellow on the light-blue egg in the bottom is elderflower, then the egg was etched with vinegar back to white, and the light blue is a quick dip (maybe 5 min.) of a white egg into sask berry dye.
The question is, how long will the color last? Berry dyes tend to be not very lightfast, so I’ll need to do some experiments and wait and see what happens.
Finally, there were enough blooms on my potted coreopsis to attempt to make a dye, and so I did. This is classic coreopsis tinctoria, or plains coreopsis that I grew from the seeds. First shade took 30 min. in the dye, background- repeated dyeing including overnight.  It turned out much more orange than I expected – the extract never gave me orange like this, only gold, but then, I never cooked the extract, just added boiling water to it. It might be worth experimenting with not cooking the fresh flowers also, just steeping in boiling hot water, and seeing whether the color is different. Unfortunately, I probably won’t get a chance to try it this year, but maybe someone else will :). Now, the recipe: Continue reading
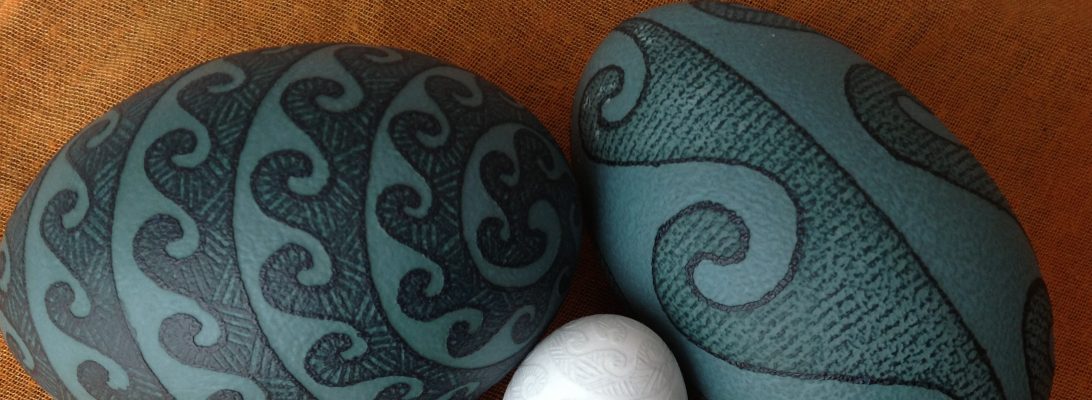
 Made this egg for someone’s 60th marriage anniversary, based on the traditional design, double yolk goose egg, vinegar etch, gold- coreopsis extract, orange – old sappan wood, then egging etch to white, and backround pink – same sappan wood. The contrast between pink and orange is not clear enough, should have made the background lighter or gone for a dark dye.
Traditional patterns and their surprises, didn’t realize there’s a star at the narrow ends, until I actually made it: 
I wanted to keep using the dyes I made for the Pysanky Toronto retreat. The dyes were not very cooperative at the event, but when they came back home and relaxed a bit, they were dyeing just fine, so it would be a shame to not use them. Still working on the strokes, and starting to work on the variety of patterns. All these patterns are from the Lithuanian book.
Dyes:

The 3-day pysanky retreat in Toronto is now over, it’s been a wonderful experience, amazing people, new friendships, exquisite art, ingenious craft, and the atmosphere full of inspiration, which, I’m sure, will last for a while. If you have an interest in decorating eggs, whether traditional, or contemporary, you have to come next year! (Possibly in June). Whether you are new at this, or you have been doing it for years, you will learn a lot.
Now, this is the only egg I managed to do, I just enjoyed too much seeing what others are doing, chatting, learning…

I was asked to do a presentation on natural dyes, and that in itself was a wonderful experience for me. I felt welcomed and very much encouraged, there is a lot of interest and desire to use natural dyes on eggs. I also made brought a set of 6 dyes, and even though natural dyes require much more time than chemical ones, they are very unpredictable, and some of them did not want to cooperate, several people tried them. By next time I think I will figure out a more cooperating set of dyes, and that will probably make a difference.
Gold – coreopsis extract, brown – combination of dried sappan wood dye and logwood extract dye. Chicken egg.
More exercises with what can well become my two favorite dyes, and with the drop-pull method. I’m discovering that there is much more potential for different strokes than I initially thought. My grandma only did simple dot and straight line circles, but the actual variety of patterns and stroke combinations is amazing, especially once you hit the google image search. Of course, my hand is still not very steady, needs more practice, but I’m looking forward to it. If someone knows a good book on these Lemkivski eggs, point me to it please!

Dyes:
Yellow – coreopsis extract, a new/different source, seems darker than the first one, I might consider diluting it more, and I ordered seeds, will attempt to grow some in a planter.
Red – still the same sappan wood. This dye is few weeks old now, has developed clumps and stuff, but still smells fine, doesn’t appear to be spoiled, and still gives the color, albeit not as easily or evenly as before.
Here is my first experiment using natural dyes on ostrich and emu eggs. I made one of each, first etched them in vinegar, then used the same two dyes – my favorite coreopsis for yellow (turned out sort of green on emu egg) and madder+cochineal for red (brownish on emu).
Here’s the ostrich:
 Photo courtesy of Mykola Swarnyk
The dots are specific to ostrich egg shells. The shell itself is very smooth, similar to rhea, and the wax tends to peel of sometimes – not sure yet what to do with that, perhaps making sure that the egg itself is on the warm side and the wax is well heated would help.
Here is emu: Photo courtesy of Mykola Swarnyk
It was etched again after the red dye.
In general, I would say, the experiment was interesting. It takes a lot of dye though, and unless one is doing a good number of big eggs at the same time, the amount of the dyes seems rather wasteful, it’s not clear what to do with them afterward – I put mine in a fridge and used some for the eggs in the previous post, but they did not work quite as well as the fresh ones would be expected to work.
For now I only have one or two emus left, and no other big eggs (have plenty of duck and goose instead), so probably will not be dyeing the big ones any time soon. It would be interesting to use dye on rhea egg – the color of its own shell should give nice tones.
I had a thick pen and some dyes left over from making big eggs (which I will show you later), so I made a few simple eggs. I love using the thick pen even on small eggs.
The dyes did not cooperate so well, especially the red one, not sure why, they might have not liked going in and out of the fridge. The eggs also did not provide a very even coloring surface. Maybe because I wiped some pencil lines with vinegar? To be further explored.
Yellow is coreopsis as usual and red (or rather orange) is madder with cochineal. Duck eggs.


Some more experiments with same dyes, except this madder is from roots, not from powdered extract. In the first egg I overdid it with madder (because I have both light and dark red from the same dye), and it ate though the wax and messed with the yellow of coreopsis. Duck eggs.


