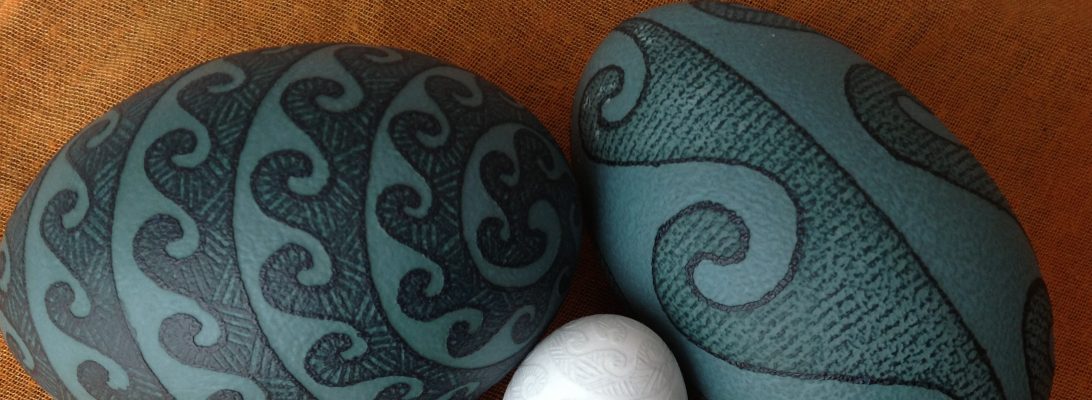
I thought it would be interesting to use camomile on a traditional egg pattern with sort of inverted camomile on it.
Yellow – dried camomile with alum (herbal tea bag), black – logwood with iron. The yellow did not adhere very well to the egg shell, but it might just be something wrong with the egg itself, it worked ok on other eggs.
The pattern in from Vira Manko’s book, from Yaroslav, Nadsyannya.
I have tried logwood essence in the past and was not overly happy with it – it only gave black, was prone to “caking” (I think that’s what it can be called, when the dye accumulates on the surface of the egg but comes off easily whith the wax), sort of found a solution – placing the back egg into another dye (I think I used red Sappan wood), to seal the black of logwood more to the surface of the egg, and didn’t make it again even though I do still have some of the essence powder.
Then, me being the restless experimenter, I saw the logwood chips being sold in one of the online shops, and could not resist buying them and trying them out.
According to Cardon, logwood (Lat. Haematoxylum campechianum) was the Mayan black dye, the word for logwood tree and for the color black are the same in Mayan language. It was brought to Europe along with the other South- and Central American dyes, and at the beginning caused some confusion – the lilacs, blues and purples achieved with logwood were extremely desirable but not lightfast, so at some point there was even an attempt to outlaw the logwood dye. When the Europeans finally got over their fashion desires and started using logwood for the black, the ration of quality per price of it ended up being much better than other sources of black, including the later non-natural version. It kept being used long after the invention of the chemical dyes, the last shipment of logwood logs came to England around the beginning of the second world war, and the last of that was milled sometime in the 1960-s. Logwood essence was already in use for a while and was more economical to bring over. It is still used now in medical pathology, haematoxylin which is made from logwood is a common stain used in histology.
So, here are some of my first logwood chip result. I have soaked them in boiling water with some calcium, and the first batch of dye was this soaked water, the second one was the same chips simmered in new water again, giving a very similar if not the same result. The dye I got was a bit brown-looking, and was giving a sort of cream to meauve to purplish brown. With strong yellow it produced the mustardy-green, and with alum – dark almost black purple. Some of the instructions said, if it looks brown, then the acidity of it can be reduced to result in a more bluish color, so I did add some baking soda since I did not have the suggested ammonia, and indeed the changed the outcome towards greyish-blue with alum and black with iron. Similar results on turkey eggs.
I’ll try to get some ammonia and play more with it.
And some more buckthorn experiments, the lighter one with alum, the darker one with iron. I might stop making it with alum except maybe as a base for other colors, however the chocolate color with iron is very handsome looking.
The wax is still on, the contrast will be stronger once it’s off.
About a month ago we went to a local art shop which is the home base of the amazing water-colour paints (https://stonegroundpaint.com), and as we got talking about colors, paints and dyes, the owner, Eric, brought out a container of dried cochineal and gave me some to take home. So yesterday I finally got to it and cooked up some dye with alum and cream or tartar (as suggested by some fabric dyeing recipes). The pink you see on these eggs is that cochineal dye.
The other coral-like reddish orange is coreopsis extract with alum on top of the fist cochineal. The brown is the same cochineal-coreopsis sequence finished with a dip in iron water.
I will have to play more with the next batches of the dye (I only used about a teaspoon of bugs, which I then ground not very finely), I will likely use more bugs next time (to make the color more concentrated), I’ll grind them better, and will start with no mordants, and add cautiously.
For the first experiment with the whole bugs, I think this is not bad. I have tried cochineal extract before but didn’t have a lot of it, so I used it in combination with madder.
The next few months I will be experimenting more with cochineal, both the whole bugs and the extract. My parents gave me for Christmas a gift certificate to the Maiwa online store, so I’ll order some cochineal from them.
Made some more eggs, some were attempts to copy Lithuanian drop-pull eggs, while others were inspired by Lithuanian patterns. A number of dyes – two of coreopsis (extract and fresh), elderflower (dried), sappan wood, madder, saskatoon berries (frozen), I think that’s it though I might have forgotten something. Mainly with alum, one egg had sappan wood with iron on background.
All of these colors were achieved with the combinations of saskatoon berries (blue), sappan wood (red, pink), buckthorn (yellow), buckthorn with iron (brown), gardenia (yellow/gold), coreopsis (gold), elderflower (yellow) (except emu where no dyes were used), plus the natural variations of eggshell color and vinegar for etching.
I’m becoming more comfortable with drop-pull technique, seeing more possibilities. While most of these eggs are trying to be strictly traditional as much as possible (mostly Ukrainian, some Lithuanian), a few patterns have just appeared out of nowhere, non-traditional (though not necessarily anti-traditional) which is nice. To write “my own” design is something that almost never happened to me in the other more common technique, so to have it happen in drop-pull after a relatively short time is rather surprising and even inspiring. 🙂
I’m getting ready to put away the dyes and tools for now, but there might be some more posts of close-up shots, and who knows when the next time will be…
Buckthorn berries (and less so the bark) have been traditionally used for dyeing in the Middle East and the Mediterranean, later also by professional dyers in North America. I didn’t have access to the berries, but I bought the bark in the herb store and tried it. This buckthorn variety is Rhamnus frangula, other varieties exist and have been used for dyeing even more than this one. The egg on the left is the dye with alum, the one on the right is the same dye post-mordanted with iron.
The books (Wild Color by J.Dean) say that you can extract the dye from this bark without even cooking it, by just pouring boiling water over it and soaking overnight. It is suggested to then simmer the bark again to obtain the second batch of the dye. I tried both, with more or less the same result, so you could make half a batch by soaking and the other half by simmering and then mix them together. Like most wood or bark chips, you can dry them out afterwards and try using again for lighter shades. I have also added some cream of tartar to one of the dyes, as this was suggested by Maiwa, but didn’t see much of the difference. Still it’s something worth experimenting with in the future.
The dye itself doesn’t have a very nice smell, however, unlike most natural dyes it did not spoil after sitting for months on a warm counter. I have made it in mid-December, and it still works in March. From that point, it is definitely a keeper, worth exploring more. The color is also very nice, and seems to give a lot of potential for over-laying with other colors. The iron post-wash was not particularly effective and has partially come off when the wax was removed, it might have worked better if I added the iron directly into the dye instead of soaking the egg in iron-water. I might try that next time, I actually do have two batches of this (and it doesn’t spoil!), so I can turn one of them into an iron batch.
Sappan wood (Ceasalpinia sappan) has become my favourite source of red color for now. Native to Asia, it is the “older” cousin of what is now known as Brazil wood. When the Portuguese invaded what is now Brazil in 1500, the redwood trees they saw growing there reminded them of Sappan wood, which they already knew, called it pau-brasil and used for dyeing along with the rest of the Europe. Because of extensive use for dye and for violin bows, or perhaps the opposite, because the dye business was not economically profitable after the invention of the chemical dyes, or maybe due to both these reasons, the Brazil wood (Ceasalpinia echinata, Paubrasilia echinata) is almost extinct now, Wikipedia says that the trade of Brazilwood is likely to be banned in the immediate future. So now we are back to the good old Sappan wood, which is still available and abundant in India and China. It is used medicinally in both Ayurveda (where it’s called Pathimukham) and in Traditional Chinese medicine (where it’s called Su Mu). Continue reading →
I tried raspberry shoots, because I had access to them, and they were listed in books. Standard recipe for raw leaves, collect as many as you can, soak overnight, boil for 15-20 min, let cool, strain, add mordant and dye. The left one with alum, the right one with iron. First shade after 20 min, second after an hour, third overnight. I was not very impressed with the result, but still it’s not nothing.
Here is a comparison with chestnut leaves (on the left) and oak leaves (on the right):I would pick chestnut over raspberry any day, and yet if you don’t have one, and do have the other, you might want to give it a try. It can give you a decent yellow with alum after a couple of hours, or if you’re after aged look with that grey with iron, that could also be interesting, especially in combination with other colors.


 Sappan wood (Ceasalpinia sappan) has become my favourite source of red color for now. Native to Asia, it is the “older” cousin of what is now known as Brazil wood. When the Portuguese invaded what is now Brazil in 1500, the redwood trees they saw growing there reminded them of Sappan wood, which they already knew, called it pau-brasil and used for dyeing along with the rest of the Europe. Because of extensive use for dye and for violin bows, or perhaps the opposite, because the dye business was not economically profitable after the invention of the chemical dyes, or maybe due to both these reasons, the Brazil wood (Ceasalpinia echinata, Paubrasilia echinata) is almost extinct now, Wikipedia says that the trade of Brazilwood is likely to be banned in the immediate future. So now we are back to the good old Sappan wood, which is still available and abundant in India and China. It is used medicinally in both Ayurveda (where it’s called Pathimukham) and in Traditional Chinese medicine (where it’s called Su Mu).
  I tried raspberry shoots, because I had access to them, and they were listed in books. Standard recipe for raw leaves, collect as many as you can, soak overnight, boil for 15-20 min, let cool, strain, add mordant and dye. The left one with alum, the right one with iron. First shade after 20 min, second after an hour, third overnight. I was not very impressed with the result, but still it’s not nothing.
 I would pick chestnut over raspberry any day, and yet if you don’t have one, and do have the other, you might want to give it a try. It can give you a decent yellow with alum after a couple of hours, or if you’re after aged look with that grey with iron, that could also be interesting, especially in combination with other colors.