This is how buckthorn dye dyes more than 3 months after it was made. It was not kept in a fridge, no special treatment of any kind. There really is something to those hard core traditional dyes.

This is how buckthorn dye dyes more than 3 months after it was made. It was not kept in a fridge, no special treatment of any kind. There really is something to those hard core traditional dyes.
And here is a smell from childhood, we used to make a drink from fresh elderflowers. I wanted to try this for a while now, it gave a beautiful and quite even bright yellow in just 10 minutes.

The recipe is usual for dried flowers, put as many as you have (I had a lot, so I put maybe 40g), add water (enough to submerge 1 egg and a little extra), simmer for about 10 min, drain the liquid and add alum to it, once it’s cool, use as dye.
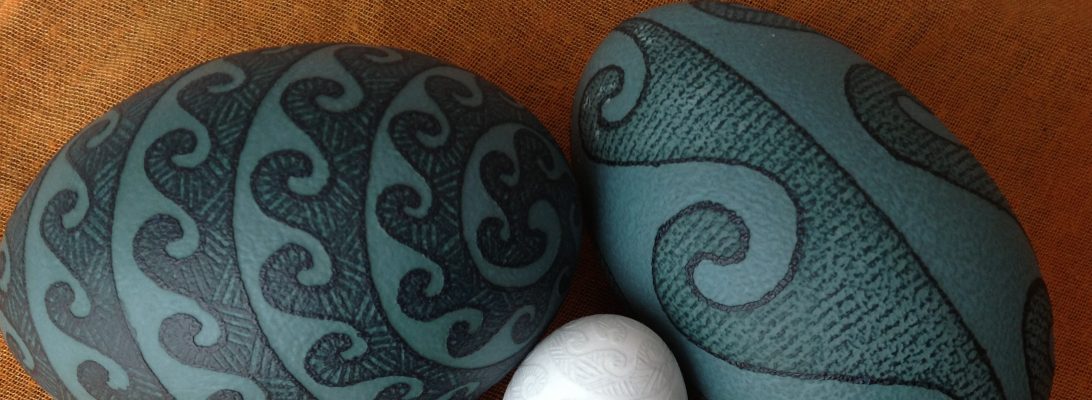
Buckthorn berries (and less so the bark) have been traditionally used for dyeing in the Middle East and the Mediterranean, later also by professional dyers in North America. I didn’t have access to the berries, but I bought the bark in the herb store and tried it. This buckthorn variety is Rhamnus frangula, other varieties exist and have been used for dyeing even more than this one. The egg on the left is the dye with alum, the one on the right is the same dye post-mordanted with iron.

The books (Wild Color by J.Dean) say that you can extract the dye from this bark without even cooking it, by just pouring boiling water over it and soaking overnight. It is suggested to then simmer the bark again to obtain the second batch of the dye. I tried both, with more or less the same result, so you could make half a batch by soaking and the other half by simmering and then mix them together. Like most wood or bark chips, you can dry them out afterwards and try using again for lighter shades. I have also added some cream of tartar to one of the dyes, as this was suggested by Maiwa, but didn’t see much of the difference. Still it’s something worth experimenting with in the future.
The dye itself doesn’t have a very nice smell, however, unlike most natural dyes it did not spoil after sitting for months on a warm counter. I have made it in mid-December, and it still works in March. From that point, it is definitely a keeper, worth exploring more. The color is also very nice, and seems to give a lot of potential for over-laying with other colors. The iron post-wash was not particularly effective and has partially come off when the wax was removed, it might have worked better if I added the iron directly into the dye instead of soaking the egg in iron-water. I might try that next time, I actually do have two batches of this (and it doesn’t spoil!), so I can turn one of them into an iron batch.
I was going to try some new dyestuffs, so I tried this Indian madder, manjistha (Rubia cordifolia). I had dry roots bought from a herb store, used a usual recipe for madder-like things: soaked for a while (about a day), added some calcium, then simmered for a few hours, then left for a while still, then strained, added alum and tried dyeing. After a few long (multiple hour) dyeing sessions, in-between which I let the egg dry out, here is what I got. It’s a bit more orange that a brown egg would be. It took very slowly, and the shade it not very deep.

It’s possible that I messed up something with the recipe, perhaps I should have chopped the roots up to make them finer (I’ve seen that recommendation somewhere). Manjistha is supposed to be less afraid of heat than regular madder (the main dyeing component, manjisthin, is present in madder too, but in a much smaller proportion), so I don’t thing that I overheated it. I used distilled water this time, who knows, maybe manjistha doesn’t like that. I din’t like the smell very much from the beginning, and after a few days the dye has started fermenting, so I ditched it. I dryed out the used roots and kept them in case I want to use them again – this is recommended with roots in general. Still have half of the original amount of unused roots, but probably won’t try it again any time soon – too much effort for a result that is too weak.
Here is what this egg looks like after writing (second dark red dye – sappan wood, and then vinegar etch):


Anyway, one more thing was tried.

This is the dye stuff that is easily available, as far as I know it just gets thrown away, so why not try to make a dye, I thought. And I did. Usual approach, boiled carrot tops in water about 20 min, left it to soak overnight, strained, added alum. The lighter color took about 20 min, the darker was left there for about 20 hrs.
This dye spoils very fast, but if you can get it for free and if you like that kind of canary yellow – why not try?
I don’t know yet how it will handle the light, I guess we’ll see.
Finally, there were enough blooms on my potted coreopsis to attempt to make a dye, and so I did. This is classic coreopsis tinctoria, or plains coreopsis that I grew from the seeds. First shade took 30 min. in the dye, background- repeated dyeing including overnight.  It turned out much more orange than I expected – the extract never gave me orange like this, only gold, but then, I never cooked the extract, just added boiling water to it. It might be worth experimenting with not cooking the fresh flowers also, just steeping in boiling hot water, and seeing whether the color is different. Unfortunately, I probably won’t get a chance to try it this year, but maybe someone else will :). Now, the recipe: Continue reading
 Sappan wood (Ceasalpinia sappan) has become my favourite source of red color for now. Native to Asia, it is the “older” cousin of what is now known as Brazil wood. When the Portuguese invaded what is now Brazil in 1500, the redwood trees they saw growing there reminded them of Sappan wood, which they already knew, called it pau-brasil and used for dyeing along with the rest of the Europe. Because of extensive use for dye and for violin bows, or perhaps the opposite, because the dye business was not economically profitable after the invention of the chemical dyes, or maybe due to both these reasons, the Brazil wood (Ceasalpinia echinata, Paubrasilia echinata) is almost extinct now, Wikipedia says that the trade of Brazilwood is likely to be banned in the immediate future. So now we are back to the good old Sappan wood, which is still available and abundant in India and China. It is used medicinally in both Ayurveda (where it’s called Pathimukham) and in Traditional Chinese medicine (where it’s called Su Mu). Continue reading
 I tried raspberry shoots, because I had access to them, and they were listed in books. Standard recipe for raw leaves, collect as many as you can, soak overnight, boil for 15-20 min, let cool, strain, add mordant and dye. The left one with alum, the right one with iron. First shade after 20 min, second after an hour, third overnight. I was not very impressed with the result, but still it’s not nothing.
Here is a comparison with chestnut leaves (on the left) and oak leaves (on the right): I would pick chestnut over raspberry any day, and yet if you don’t have one, and do have the other, you might want to give it a try. It can give you a decent yellow with alum after a couple of hours, or if you’re after aged look with that grey with iron, that could also be interesting, especially in combination with other colors.
 Made this egg few weeks ago, when sappan wood dye was still fresh. Brown chicken egg, etched with vinegar, then sappan wood. Inspired by Natalie Kit and her brown eggs that I saw at Pysanky Toronto.
The pattern is from Odarka Onyshchuk’s album, I already the same pattern in malva and buckthorn and posted earlier. Here’s the photo of both eggs with this pattern together, who knows, I might make more of these still, love that pattern this year.
 Made this egg for someone’s 60th marriage anniversary, based on the traditional design, double yolk goose egg, vinegar etch, gold- coreopsis extract, orange – old sappan wood, then egging etch to white, and backround pink – same sappan wood. The contrast between pink and orange is not clear enough, should have made the background lighter or gone for a dark dye.
Traditional patterns and their surprises, didn’t realize there’s a star at the narrow ends, until I actually made it: 